This site uses cookies to improve your experience. To help us insure we adhere to various privacy regulations, please select your country/region of residence. If you do not select a country, we will assume you are from the United States. Select your Cookie Settings or view our Privacy Policy and Terms of Use.
Cookie Settings
Cookies and similar technologies are used on this website for proper function of the website, for tracking performance analytics and for marketing purposes. We and some of our third-party providers may use cookie data for various purposes. Please review the cookie settings below and choose your preference.
Used for the proper function of the website
Used for monitoring website traffic and interactions
Cookie Settings
Cookies and similar technologies are used on this website for proper function of the website, for tracking performance analytics and for marketing purposes. We and some of our third-party providers may use cookie data for various purposes. Please review the cookie settings below and choose your preference.
Strictly Necessary: Used for the proper function of the website
Performance/Analytics: Used for monitoring website traffic and interactions
Maverick has standard FordPass Connect with embedded modem and Wi-Fi for up to 10 devices, while standard FordPass makes it easy to find the truck, check fuel level, lock and unlock the doors, and start or turn off the vehicle—all from a phone. The whole bed is a DIY fan’s paradise.
A DIY Electric and Hybrid Car Maintenance Guide Essential Tools and Tips to Get You Started This article may contain affiliate links. Essential Tools for Electric and Hybrid Car Maintenance Understanding which quality mechanics tools and other essential supplies you need is the first step in DIY maintenance.
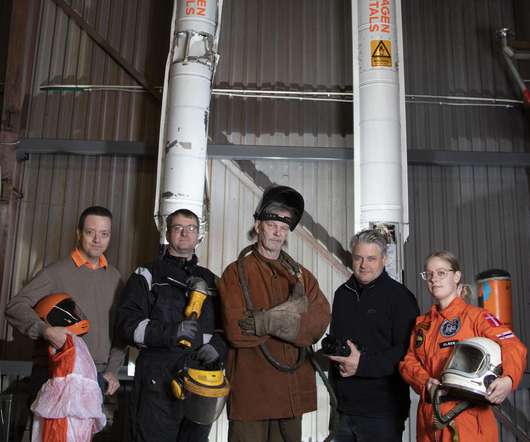
That successful mission in August 2018 was a huge step toward our goal of sending an amateur astronaut to the edge of space aboard one of our DIY rockets. The trickiest part, the double-curved "throat" section that connects the combustion chamber to the exhaust nozzle, requires computer-controlled machining equipment that we don't have.
This handles wireless connections with my sensors, appliances, and other devices. My homebrew devices are connected to the GPIO pins of a Raspberry Pi, which relays their state via Wi-Fi using the MQTT standard protocol for the Internet of Things. Each is fitted with a $20 add-on PoE “hat” to draw power from its Ethernet connection.
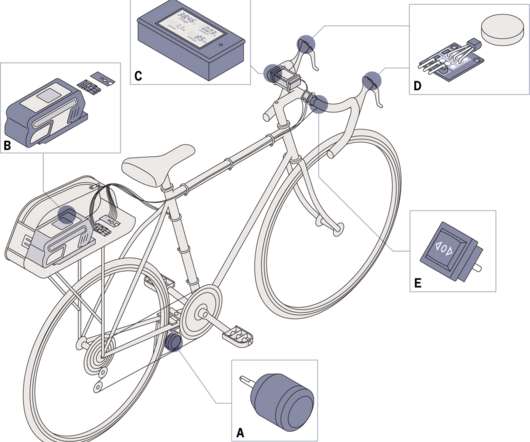
The handlebar-mounted controls connect with an Arduino, which interprets their settings and translates them into a PPM signal, which is applied to the electronic speed controller. The speed controller is connected to the motor and battery in the usual fashion, with an automotive-type blade fuse in line for safety.
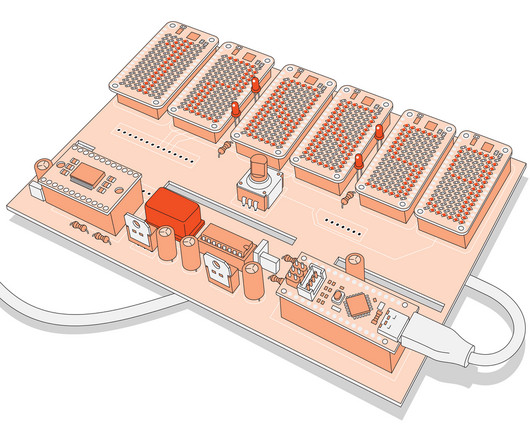
I added a DIY solder squid—a block with four flexible arms that I use to hold components in place while soldering—with a concrete base and an automatic solder fume extractor. The Grounduino provides screw terminals for hooking wires to the Nano and, as the name suggests, five extra ground connections (and five extra 5V connections as well).
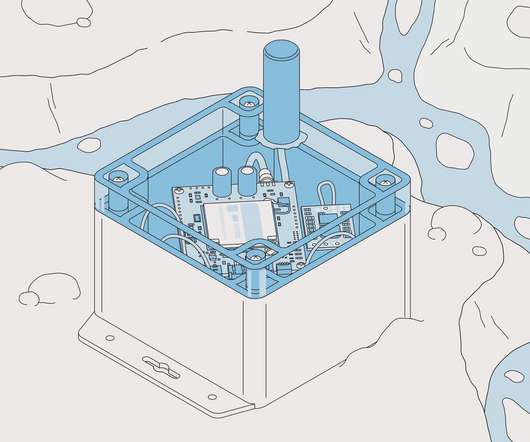
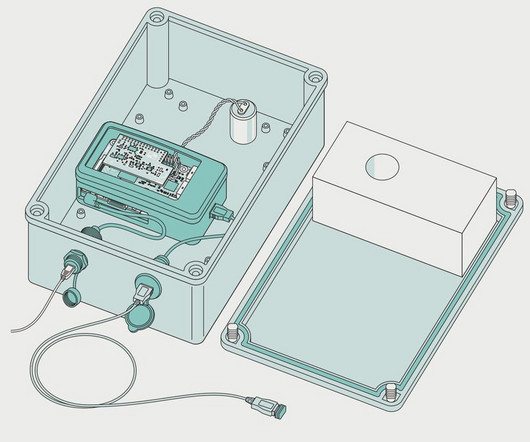
So, I set about building an open-source ice tracker from DIY components that not only proved to be much, much cheaper but also much more capable than the commercial options. With no guarantees on how long any given instrument might last, you have to deploy a lot of them to get the data you need.
I connected this. I’ve not used my DIY magnetometer to search for any submarines or alien monoliths, but I did test it using a steel hammer, which affects the readings in an obvious way when placed within about a meter of the sensor board. This article appears in the May 2022 print issue as “A DIY Magnetometer.”.
The motors, controllers, batteries, and everything else is usually built into a flat deck connected to the wheels, meaning the rest of the vehicle is basically just bolted on top. The engineer in me always thought it’d be fun to have just the bare skateboard, meaning you could go wild with your ideas of what to put on top.
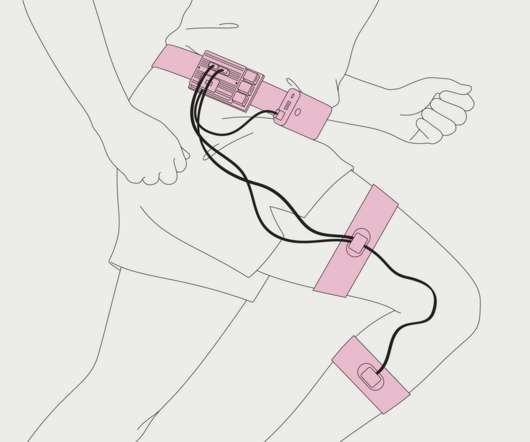
The IMUs are connected to a Raspberry Pi using the I2C protocol. The counter uses two of them, one attached at midthigh, the other at midshank. In our tests, we sometimes used toupee adhesive to hold various IMUs in place, but a Velcro strap works great, too!
To get connected with it took some experimentation because the pdf documentation says very little. I got connected and this is the proceedure: 1) set your USB serial port to an open port and use 115.2K 2) connect 2 12 volt batteries in series to make about 25VDC across terminals B- and B+ of the controller.
Just about every device you own is probably available with Internet connectivity. needs Internet connectivity is up for debate. Connectivity usually comes at a premium, and it also usually involves buying a brand new whatever it is, because new hardware and software and services are required.
The handlebar-mounted controls connect with an Arduino, which interprets their settings and translates them into a PPM signal, which is applied to the electronic speed controller. The speed controller is connected to the motor and battery in the usual fashion, with an automotive-type blade fuse in line for safety.
And we intend to stimulate and grow new connections - a whole lot of them. In addition to Creative Greenius you’ll find these great EV Driven blogs: DIY Electric Car. We have come together to find and organize the best content from blogs and other web sites. Starting right now. Electric Car Blog. Electric Cars are for Girls.
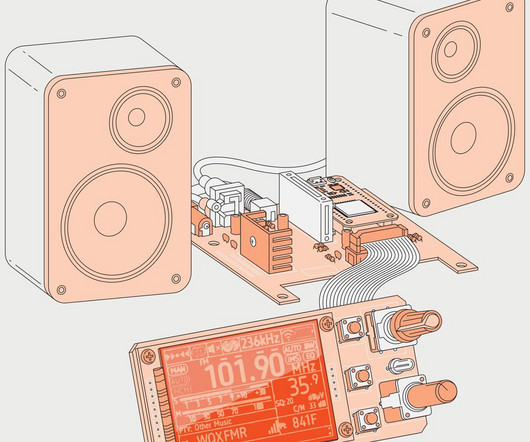
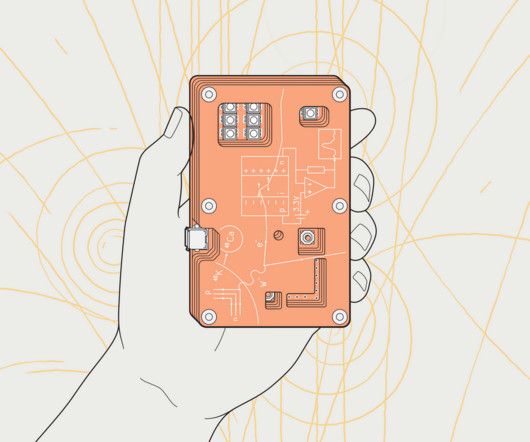
These contain a TEF6686 chip in a DIY-friendly package, suitable for through-hole soldering (the TEF6686 itself is a surface-mounted chip), and with radio-frequency shielding to help minimize interference. I soon settled on a configuration consisting of two printed circuit boards connected by ribbon cable.
Fortunately, certain maintenance tasks are DIY projects and can save you money, as the average cost of car repairs ranges between $300 to $500. This article highlights some DIY car maintenance tasks you can tackle at home. Straight-end connection wipers require a screwdriver to depress a tab within the arm.
Finally, after cajoling the machinist for a month, I finally got my connector between the motor and trans. I do have to hand it to Jon at Portland Manufacturing, he did a great job fabricating this connector it fit like a glove, and after assembling the motor and trans. It ran like a dream.
Searching the interwebs, I found no shortage of leads about how to build a DIY seismometer. The problem is that the DIY seismometer designs I was seeing were large and ungainly contraptions. I investigated what some other Web-connected Raspberry Shakes had recorded during that earthquake.
A rotary controller connected directly to the Nano lets you set the time. A battery backup connected to this port is needed to prevent resets due to power loss—using one of the popular coin-cell-based real-time backup clocks would be pointless due to their relative inaccuracy.
Oliver Keller at CERN’s S’Cool Lab has created a DIY particle detector that relies on inexpensive silicon photodiodes to detect alpha and beta particles (helium nuclei and free electrons whizzing through the air, respectively) and estimate their energy. I’m doing a Ph.D. Fortunately, I didn’t have to start from scratch.
Now, after countless versions of wiring things together, and even designing my own audio mixers, I finally have a DIY solution that works within a reasonable budget. I chose the $10 ESP32 because it would allow me to operate the WM8960 and also accept audio via a Bluetooth connection from, say, my phone, and stream it to the WM8960.
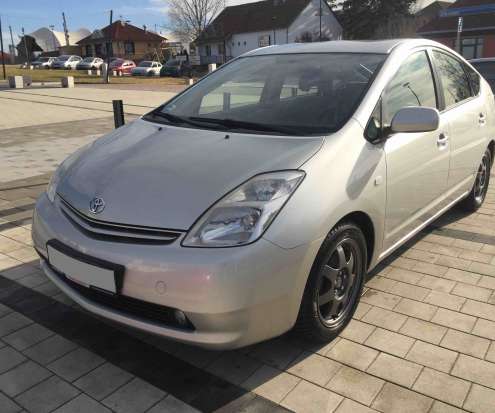
There are also videos on Youtube where people change the pack the DIY way or the individual modules, but be aware to only buy individual modules from a trusted source. One of our 2006 Prius’ pack needed servicing and it only cost a few hundred dollars to fix 7 modules and change the bus bars connecting the modules by a hybrid shop.
It’s nearly impossible to find a household today that doesn’t have at least one connected smart home device installed. It redefined the home security space by introducing wireless, DIY products and pioneered giving customers the ability to monitor their homes via a smartphone app. SimpliSafe works differently.
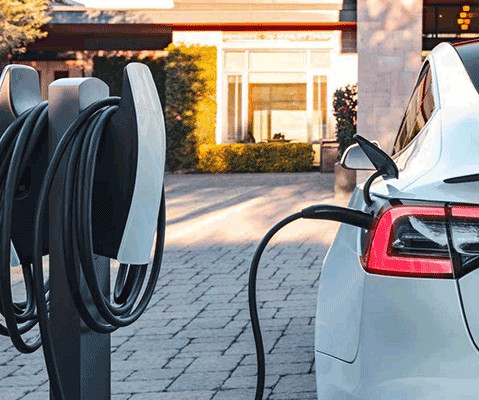
Electrical Hazards: Home charging stations require a high-voltage connection, which, if not installed properly, can pose a risk of electrocution, electrical fires, and damage to your vehicle or home. Section 1: Identifying Potential Risks 1.1 Section 1: Identifying Potential Risks 1.1 Section 2: Selecting the Right Equipment 2.1
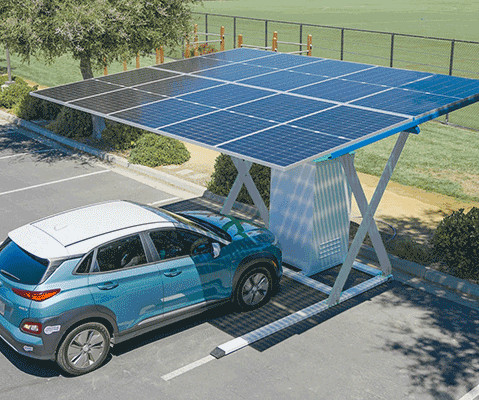
The Simple Installation Process For small solar setups oriented towards sheds, DIY installation kits can streamline the process: – Position the Panel: Orient the solar panels to maximize sun exposure based on your hemisphere. . – Thin-Film: The most flexible solar panel option, but has marginally reduced efficiency levels.
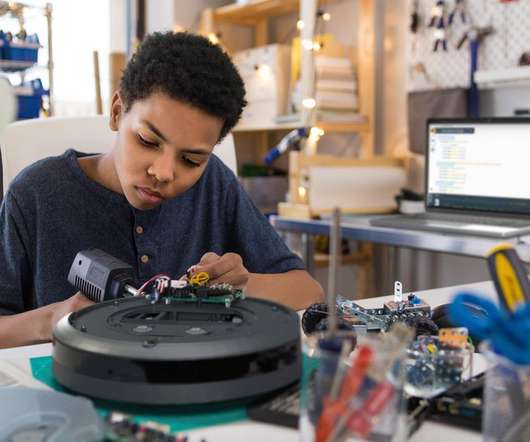
It’s a little scary to recall that when iRobot last released an update to the Create DIY/educational robot platform, the calendar read 2014 (!). If this mainstream vote of confidence in ROS 2 by a company like iRobot surprises you, well then maybe a Create 3 should be the next robot in your life.
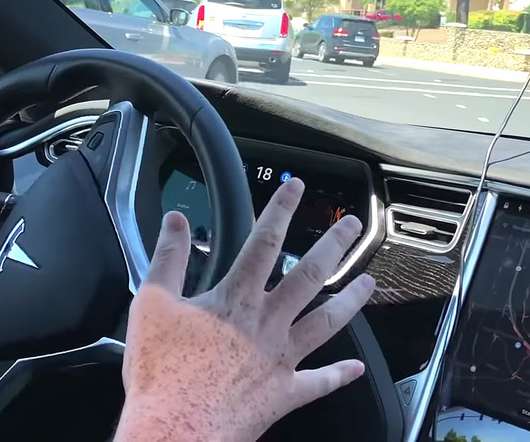
There’s also a DIY option for this cleaning, and details for this can be found in the service manual under “Quad Camera Cover – Upper (remove and replace).” Tesla rolls out new commands feature for better connectivity Need accessories for your Tesla? What are your thoughts?
I was wondering if anyone had any luck connecting their motor controller to CAN through arduino. Hey guys, I am an newbie when it comes to motor controllers. I'm currently in the design phase so I have yet to actual get my hands on the parts. If anyone has any advice with CAN, please let me know.
I thought the engine/tranny was connected to the frame with three engine mounts, two bolts on the side and one connection in front. After removing these three connections I started to lift. I looked under the car (again) and noticed that the tranny seems connected to the underside. Something didn't feel right.
Connected the traction cables and charger cables to the bus bar and enclosed it in an electrical box. Connected traction fuse, in separate electrical box near the pack. Connected charger cables to bus bar via waterproof plug (not necessary for the bench test). Connected the rows together.
The only thing left connecting the engine to the car were the engine bolts. We connected the lift, removed the engine bolts (holding the engine from the frame) and started to lift. We (Stu and I) disconnected the axle from the outer CV joint (basically disconnected the axle from the wheel).
These include a steering wheel sensor, seat sensors, and seatbelt sensors, all of which must be controlled or connected by the driver at the time of Autopilot’s use. We have seen several companies and some owners use DIY hack devices to bypass these safety thresholds.
50 inch aluminum plate as the first step of connecting the transmission to the electric motor. My plan was to connect the two Clark forklift motors together end wise. I Made a template of masonite of the transmission bolt patern to transfer onto the.50 There just enough room to do it in the car.
The waterproof unit is manufactured with a beefy anodized aluminum frame, clear polycarbonate flame-proof cover, Hall Effect throttle pedal input, waterproof automotive style control circuit connections (plugs with 10ft leads included), and easy to connect liquid cooling connections. WarP-Drive Interface Unit.
So far it powers up but doesn''t collect data, only beeps at me and says theres no connection from the main data module to the data collection modules. Motor is in, main cables are crimped. Now testing BMS. BMS is HiPower OEM. Attached Thumbnails.'
Got it positioned and connected the driver sigde motor mount. Started putting the motor/tranny into the engine compartment. Feels good. Kind of wondering if I should have tested the motor before I put it in. Not sure how I would have done that.
I was able to remove the starter which was the last thing connecting the engine to the tranny. First, thanks to those folks on various forums who have responded to my questions. They are now separated. Progress showni in last six photos in this album [link]. Need to clean car up and figure out what's next.
The Maverick EcoBoost was not designed to be a heavy-duty work truck, but more for the weekend warrior/home owner doing DIY projects or used for active lifestyles for activities such as biking and kayaking. FordPass Connect offers convenience features such as keyless entry and remote locking and engine start.
I am planning on tapping in to each cell manually and then connecting each battery individually to make sure each battery is recognized by itself (after triple checking with my multimeter of coarse). I have hooked up power and ground only, verified I can communicate with my laptop via the CANdapter.
So I'm having to bore and smooth the cell connections out, and slightly enlarge the copper plate paths. Build progress. 3D printed parts are in hand, look great. Only issue is the dimensions are slight smaller due to ABS shrinkage. Certainly not show stoppers by any means. FDM 3D printing is somewhat of an art vs CNC.
There are a bunch of wires that need to be connected in order to charge the batteries. I have an electrical issue with a Delta-Q Quiq charger that won`t charge 6 GEL batteries that are used in a 2004’ GEM E825 golf cart. I think the problem lies in the wiring. The Delta Q charger is a 72V charger and had 8 wires as output.
my gearbox is pretty shot & I would prefer to do without it altogether and just connect the. I get that it's probably simpler for alignment etc., but also extra weight and a bit redundant given the torque of an electric motor ? To use gearbox & adapter plate - or not ?
We removed one bolt that connects the transmission to the axle/CV joint and then the bit broke. Tonight David M, brother of Stuart M, came by to lend a hand. I'd really like to get that transmission disconnected from the axle so we can raise the engine. Without that bit, we went to remove the gas tank.
Personal connections are one of my primary sources of information about what is happening in Ukraine. Mykhailyshyn notes that he made a significant portion of his connections at scientific and technical conferences, including UKRCON , which is held every two years.
We organize all of the trending information in your field so you don't have to. Join 5,000+ users and stay up to date on the latest articles your peers are reading.
You know about us, now we want to get to know you!
Let's personalize your content
Let's get even more personalized
We recognize your account from another site in our network, please click 'Send Email' below to continue with verifying your account and setting a password.


Let's personalize your content